First Steps
The simplest FastAPI file could look like this:
from fastapi import FastAPI

app = FastAPI()


@app.get("/")
async def root():
    return {"message": "Hello World"}
Copy that to a file main.py.
Run the live server:
$ <font color="#4E9A06">uv run fastapi</font> dev
<span style="background-color:#009485"><font color="#D3D7CF"> FastAPI </font></span> Starting development server 🚀
Searching for package file structure from directories
with <font color="#3465A4">__init__.py</font> files
Importing from <font color="#75507B">/home/user/code/</font><font color="#AD7FA8">awesomeapp</font>
<span style="background-color:#007166"><font color="#D3D7CF"> module </font></span> 🐍 main.py
<span style="background-color:#007166"><font color="#D3D7CF"> code </font></span> Importing the FastAPI app object from the module with
the following code:
<u style="text-decoration-style:solid">from </u><u style="text-decoration-style:solid"><b>main</b></u><u style="text-decoration-style:solid"> import </u><u style="text-decoration-style:solid"><b>app</b></u>
<span style="background-color:#007166"><font color="#D3D7CF"> app </font></span> Using import string: <font color="#3465A4">main:app</font>
<span style="background-color:#007166"><font color="#D3D7CF"> server </font></span> Server started at <font color="#729FCF"><u style="text-decoration-style:solid">http://127.0.0.1:8000</u></font>
<span style="background-color:#007166"><font color="#D3D7CF"> server </font></span> Documentation at <font color="#729FCF"><u style="text-decoration-style:solid">http://127.0.0.1:8000/docs</u></font>
<span style="background-color:#007166"><font color="#D3D7CF"> tip </font></span> Running in development mode, for production use:
<b>fastapi run</b>
Logs:
<span style="background-color:#007166"><font color="#D3D7CF"> INFO </font></span> Will watch for changes in these directories:
<b>[</b><font color="#4E9A06">'/home/user/code/awesomeapp'</font><b>]</b>
<span style="background-color:#007166"><font color="#D3D7CF"> INFO </font></span> Uvicorn running on <font color="#729FCF"><u style="text-decoration-style:solid">http://127.0.0.1:8000</u></font> <b>(</b>Press CTRL+C
to quit<b>)</b>
<span style="background-color:#007166"><font color="#D3D7CF"> INFO </font></span> Started reloader process <b>[</b><font color="#34E2E2"><b>383138</b></font><b>]</b> using WatchFiles
<span style="background-color:#007166"><font color="#D3D7CF"> INFO </font></span> Started server process <b>[</b><font color="#34E2E2"><b>383153</b></font><b>]</b>
<span style="background-color:#007166"><font color="#D3D7CF"> INFO </font></span> Waiting for application startup.
<span style="background-color:#007166"><font color="#D3D7CF"> INFO </font></span> Application startup complete.In the output, there's a line with something like:
INFO: Uvicorn running on http://127.0.0.1:8000 (Press CTRL+C to quit)That line shows the URL where your app is being served on your local machine.
Check it
Section titled “Check it”Open your browser at http://127.0.0.1:8000.
You will see the JSON response as:
{"message": "Hello World"}Interactive API docs
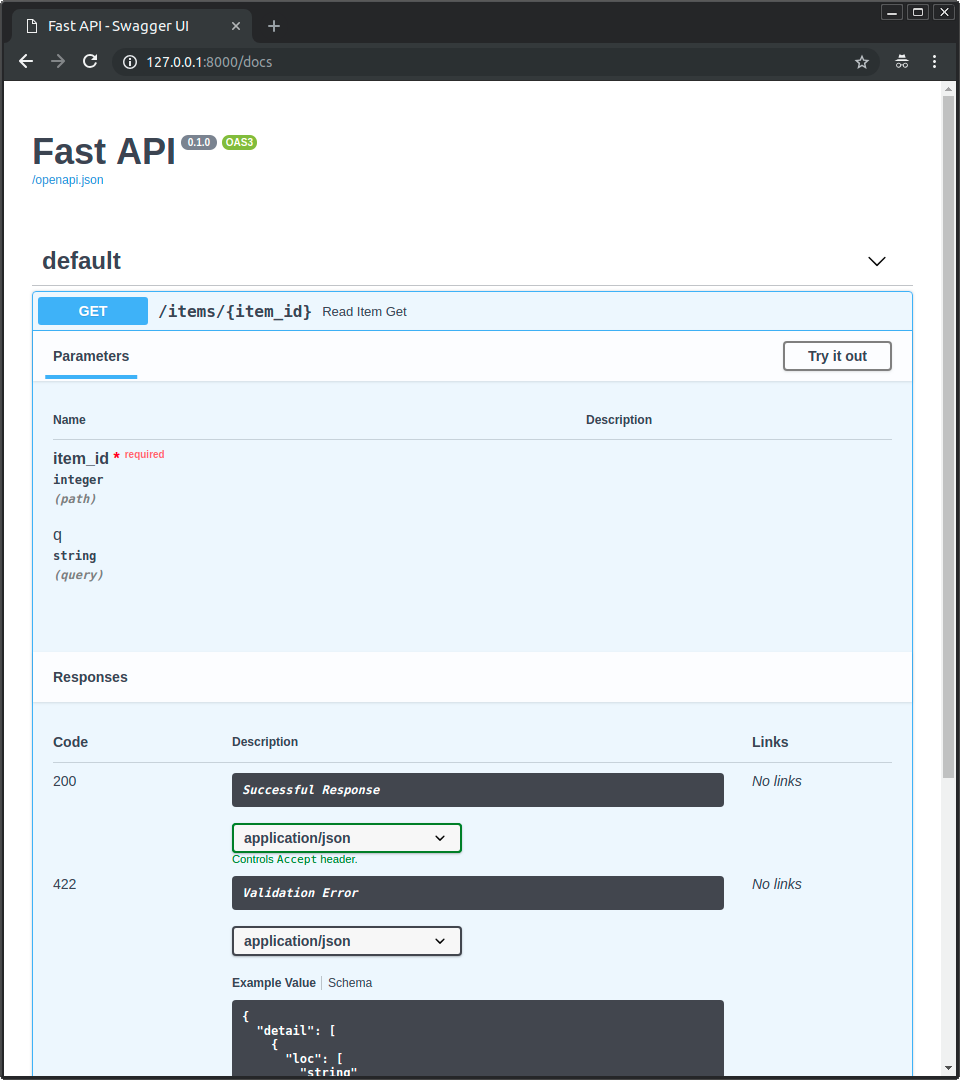
Section titled “Interactive API docs”Now go to http://127.0.0.1:8000/docs.
You will see the automatic interactive API documentation (provided by Swagger UI):
Alternative API docs
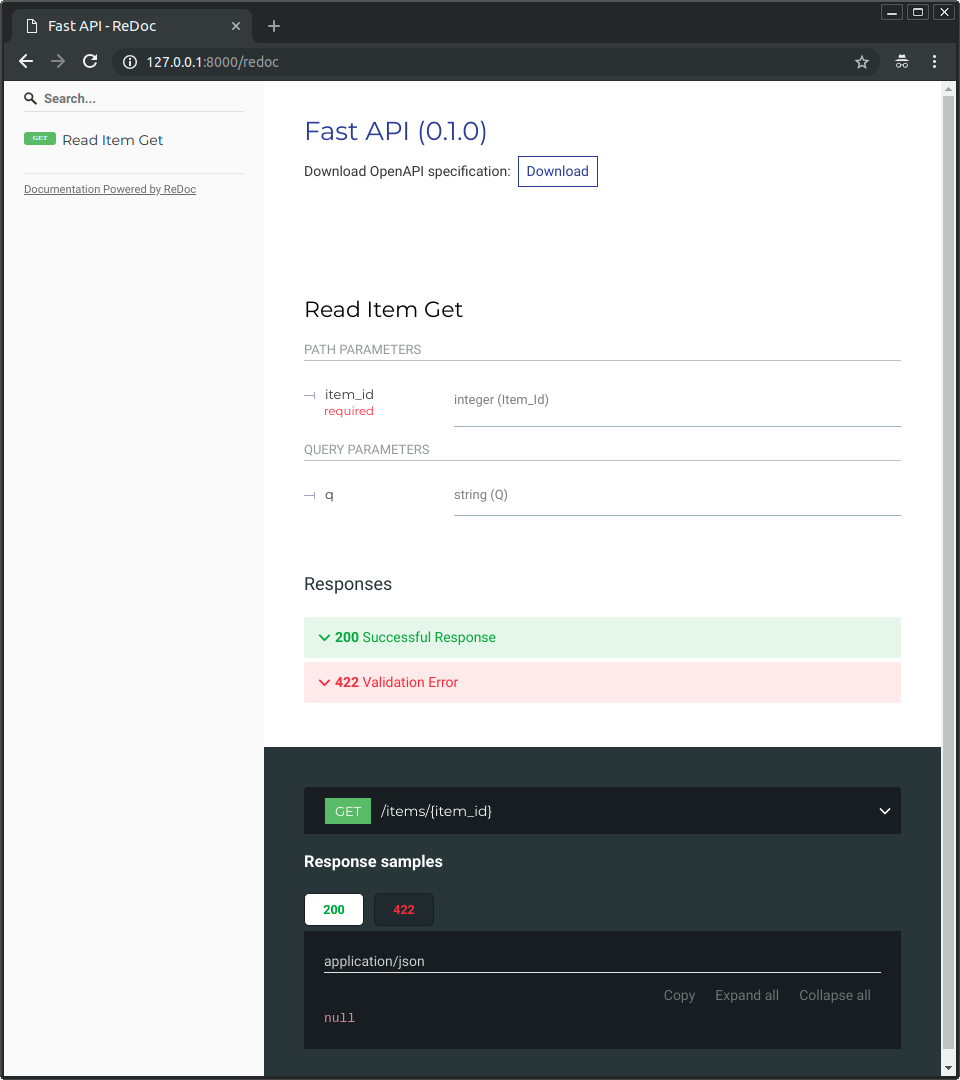
Section titled “Alternative API docs”And now, go to http://127.0.0.1:8000/redoc.
You will see the alternative automatic documentation (provided by ReDoc):
OpenAPI
Section titled “OpenAPI”FastAPI generates a "schema" with all your API using the OpenAPI standard for defining APIs.
"Schema"
Section titled “"Schema"”A "schema" is a definition or description of something. Not the code that implements it, but just an abstract description.
API "schema"
Section titled “API "schema"”In this case, OpenAPI is a specification that dictates how to define a schema of your API.
This schema definition includes your API paths, the possible parameters they take, etc.
Data "schema"
Section titled “Data "schema"”The term "schema" might also refer to the shape of some data, like a JSON content.
In that case, it would mean the JSON attributes, and data types they have, etc.
OpenAPI and JSON Schema
Section titled “OpenAPI and JSON Schema”OpenAPI defines an API schema for your API. And that schema includes definitions (or "schemas") of the data sent and received by your API using JSON Schema, the standard for JSON data schemas.
Check the openapi.json
Section titled “Check the openapi.json”If you are curious about what the raw OpenAPI schema looks like, FastAPI automatically generates a JSON (schema) with the descriptions of all your API.
You can see it directly at: http://127.0.0.1:8000/openapi.json.
It will show a JSON starting with something like:
{
    "openapi": "3.1.0",
    "info": {
        "title": "FastAPI",
        "version": "0.1.0"
    },
    "paths": {
        "/items/": {
            "get": {
                "responses": {
                    "200": {
                        "description": "Successful Response",
                        "content": {
                            "application/json": {


...
What is OpenAPI for
Section titled “What is OpenAPI for”The OpenAPI schema is what powers the two interactive documentation systems included.
And there are dozens of alternatives, all based on OpenAPI. You could easily add any of those alternatives to your application built with FastAPI.
You could also use it to generate code automatically, for clients that communicate with your API. For example, frontend, mobile or IoT applications.
Configure the app entrypoint in pyproject.toml
Section titled “Configure the app entrypoint in pyproject.toml”You can configure where your app is located in a pyproject.toml file like:
[tool.fastapi]
entrypoint = "main:app"
That entrypoint will tell the fastapi command that it should import the app like:
from main import appIf your code was structured like:
.
├── backend
│   ├── main.py
│   ├── __init__.py
Then you would set the entrypoint as:
[tool.fastapi]
entrypoint = "backend.main:app"
which would be equivalent to:
from backend.main import appfastapi dev with path or with --entrypoint CLI option
Section titled “fastapi dev with path or with --entrypoint CLI option”You can also pass the file path to the fastapi dev command, and it will guess the FastAPI app object to use:
$ uv run fastapi dev main.pyOr, you can also pass the --entrypoint option to the fastapi dev command:
$ uv run fastapi dev --entrypoint main:appBut you would have to remember to pass the correct path\entrypoint every time you call the fastapi command.
Additionally, other tools might not be able to find it, for example the VS Code Extension or FastAPI Cloud, so it is recommended to use the entrypoint in pyproject.toml.
Deploy your app (optional)
Section titled “Deploy your app (optional)”You can optionally deploy your FastAPI app to FastAPI Cloud with a single command. 🚀
$ uv run fastapi deploy

Deploying to FastAPI Cloud...

✅ Deployment successful!

🐔 Ready the chicken! Your app is ready at https://myapp.fastapicloud.dev
The CLI will automatically detect your FastAPI application and deploy it to the cloud. If you are not logged in, your browser will open to complete the authentication process.
That's it! Now you can access your app at that URL. ✨
Recap, step by step
Section titled “Recap, step by step”Step 1: import FastAPI
Section titled “Step 1: import FastAPI”from fastapi import FastAPI
app = FastAPI()
@app.get("/")
async def root():
return {"message": "Hello World"}FastAPI is a Python class that provides all the functionality for your API.
Step 2: create a FastAPI "instance"
Section titled “Step 2: create a FastAPI "instance"”from fastapi import FastAPI
app = FastAPI()
@app.get("/")
async def root():
return {"message": "Hello World"}Here the app variable will be an "instance" of the class FastAPI.
This will be the main point of interaction to create all your API.
Step 3: create a path operation
Section titled “Step 3: create a path operation”"Path" here refers to the last part of the URL starting from the first /.
So, in a URL like:
https://example.com/items/foo...the path would be:
/items/fooWhile building an API, the "path" is the main way to separate "concerns" and "resources".
Operation
Section titled “Operation”"Operation" here refers to one of the HTTP "methods".
One of:
POSTGETPUTDELETE
...and the more exotic ones:
OPTIONSHEADPATCHTRACE
In the HTTP protocol, you can communicate to each path using one (or more) of these "methods".
When building APIs, you normally use these specific HTTP methods to perform a specific action.
Normally you use:
POST: to create data.GET: to read data.PUT: to update data.DELETE: to delete data.
So, in OpenAPI, each of the HTTP methods is called an "operation".
We are going to call them "operations" too.
Define a path operation decorator
Section titled “Define a path operation decorator”from fastapi import FastAPI
app = FastAPI()
@app.get("/")
async def root():
return {"message": "Hello World"}The @app.get("/") tells FastAPI that the function right below is in charge of handling requests that go to:
- the path
/ - using a
getoperation
You can also use the other operations:
@app.post()@app.put()@app.delete()
And the more exotic ones:
@app.options()@app.head()@app.patch()@app.trace()
Step 4: define the path operation function
Section titled “Step 4: define the path operation function”This is our "path operation function":
- path: is
/. - operation: is
get. - function: is the function below the "decorator" (below
@app.get("/")).
from fastapi import FastAPI

app = FastAPI()


@app.get("/")
async def root():
return {"message": "Hello World"}This is a Python function.
It will be called by FastAPI whenever it receives a request to the URL "/" using a GET operation.
In this case, it is an async function.
You could also define it as a normal function instead of async def:
from fastapi import FastAPI

app = FastAPI()


@app.get("/")
def root():
return {"message": "Hello World"}Step 5: return the content
Section titled “Step 5: return the content”from fastapi import FastAPI
app = FastAPI()
@app.get("/")
async def root():
return {"message": "Hello World"}You can return a dict, list, singular values as str, int, etc.
You can also return Pydantic models (you'll see more about that later).
There are many other objects and models that will be automatically converted to JSON (including ORMs, etc). Try using your favorite ones, it's highly probable that they are already supported.
Step 6: Deploy it
Section titled “Step 6: Deploy it”Deploy your app to FastAPI Cloud with one command: fastapi deploy. 🎉
About FastAPI Cloud
Section titled “About FastAPI Cloud”FastAPI Cloud is built by the same author and team behind FastAPI.
It streamlines the process of building, deploying, and accessing an API with minimal effort.
It brings the same developer experience of building apps with FastAPI to deploying them to the cloud. 🎉
FastAPI Cloud is the primary sponsor and funding provider for the FastAPI and friends open source projects. ✨
Deploy to other cloud providers
Section titled “Deploy to other cloud providers”FastAPI is open source and based on standards. You can deploy FastAPI apps to any cloud provider you choose.
Follow your cloud provider's guides to deploy FastAPI apps with them. 🤓
- Import
FastAPI. - Create an
appinstance. - Write a path operation decorator using decorators like
@app.get("/"). - Define a path operation function; for example,
def root(): .... - Run the development server using the command
fastapi dev. - Optionally deploy your app with
fastapi deploy.